FITTING PLASTIC BATH PANELS.
I hate this job, mainly because it should be a quick and simple kit AND IT'S NOT, why not?
If you invent a system - goodness knows it's not rocket science - you'll make a bomb - in monetary terms! In lieu of any innovation, allow 3 or 4 hours for this pointless task.
here's what you do ---
You'll need wood to make a frame or battens. It doesn't need to be new! Rummage through your wood pile - or a friends. Failing that .....Buy some????
Even better is extruded plastic - a good supplier will have what you need. Sadly TPC, our local supplier, has folded and I don't have time to go to Bristol to the next best supplier in the area. IMO, Plastic beats wood for this job, as it doesn't mind getting wet and is light, cheap, and adheres well to the bath. It's also soft and flexible, which means it is a dream to work with and can be EASILY retro adjusted in situ - if you see what I mean.

You'll need a few other things

Use a good quality grab adhesive - white/invisible (if bath and panels are white)
You'll also need a saw, some screws, a drill and wood drill bit ( a sensible size to make guide holes for screws), screw driver to suit screws, spirit level and a straight edge. Some spacers - thin pieces of wood/lino/plastic/double glazing spacers (in photo above) (could be a few layers of frozen or ready meal cartons) In this case Ive used off cuts from the bath panel as SCREWFIX have supplied a side panel that's at least 3cm too long - IDIOTS.

Cut spacers into small pieces.

Sand them to remove burs.

Cut wood into small pieces, drill a hole through spacers and wood pieces and introduce your screw. Repeat 9 more times. I drilled each piece individually, but you could drill through all 2 or more layers like a big sandwich.

Use your spirit level to decide exactly where the bottom of the bath panels should rest. It's very difficult to do this by eye. Draw a line - pencil will wash off most surfaces. Space your blocks along your carefully positioned line and screw down. You can see the narrow slot for the flange to slide into. You're blocks will be under the bath and not outside it!
THE AIM OF THE WOOD WORK -
Is to make a channel, or slot into which the flanges at the top and bottom of your bath panels will slot SNUGLY.
To get a snug fit, you will need to experiment with the battens to get just the right amount of gap to make the job a success - too little gap and the flange wont go in at all - too much gap and the panel will wobble and flap about all the time and, possibly, fall out altogether.
BEAR IN MIND THE AIM AS YOU WORK!
Screw your wood and spacer sandwich to the floor. I have a batten running along the floor as the bath had to be set a smidgen higher than we wanted - don't ask : (
You could put down one long batten with spacer under if you prefer. It's quicker and needs more wood/less screws. I'm not sure why I didn't do it that way ??

The end panel can be done the same way, but I used a plastic joiner from the old kitchen worktop. These joiners slope and will act as a cam to pinch the panel bottom under.

The batten for the top of the bath needs to fit. So, lay it on top of the bath rim to double check.
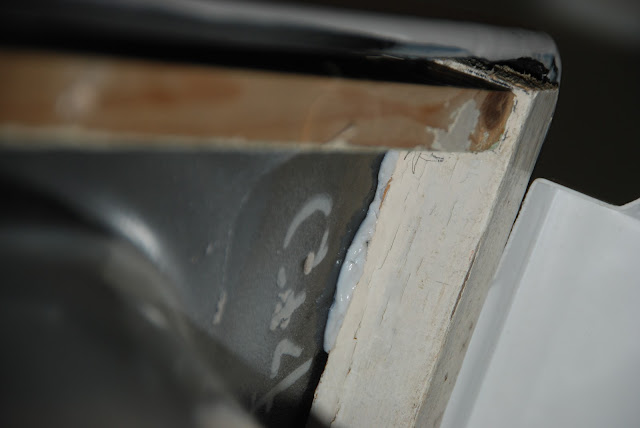
Sadly this shot has rotated itself, which makes it confusing! But you can see that the corner of batten, under the rim of the bath , is in need of a trim. I cut the corner at an angle so the flange on the bath panel would sit nicely at that point. Be prepared to OFFER UP your battening and double check it'll all work BEFORE putting on the adhesive - I didn't and went up and down the stairs, through the house, trying to avoid getting glue every where as I went.

When you're sure the top battens will fit, screw them together at the corner and put on the adhesive.

Get the top battens in place and the apply pressure. Note: I've padded under the G Clamps. Don't over tighten the clamps, you're only holding on wood. Go and have a cup of tea.

Slot the flanges into their places and invisibly (neat trick if you can do it) screw the end panel to the floor, using a couple of short screws through bottom flange. - You can see I've taken off the clamps (!!), and I've put an upright support at each corner - wedged in at a bit of an angle to keep the top batten in place until set. You can attach them permanently if you prefer. Otherwise, they can be removed after a minimum of 24 hours. Better to leave the clamps in place over night, but the weekend is here, and the occupiers wont want to share their bath times with 3 G clamps. WELL WHO WOULD??
 |
| Fitted Bath panels |
The side panel needs to be removable so that the pipework can be accessed in the future. You can hold it in place with a couple of MIRROR SCREWS at the bottom corners of the panel, they're attractive and shiny .... until they begin to rust ....
No comments:
Post a Comment
I love hearing from you, so please feel free to leave your comments here as often as you fancy. I will read what you leave for me and may even post it here for everyone to enjoy. As I can't alter anything you write, please don't use my first name as I want to maintain my privacy. Ta.